Published
- 6 min read
How to implement WhatsApp message API using node.js

Overview
WhatsApp API is a great way to send to your customers directly from your website to improve business. In this guide, I will walk you through each step to implement WhatsApp API in your website.
What we are going to do
- Create an App in the Facebook developer console
- Create a Facebook business page
- Enable WhatsApp API in the developer
- Create a WhatsApp message template
- Get API token and test mobile number to use as an API agent
- Create a frontend website to send messages to WhatsApp users
Concepts
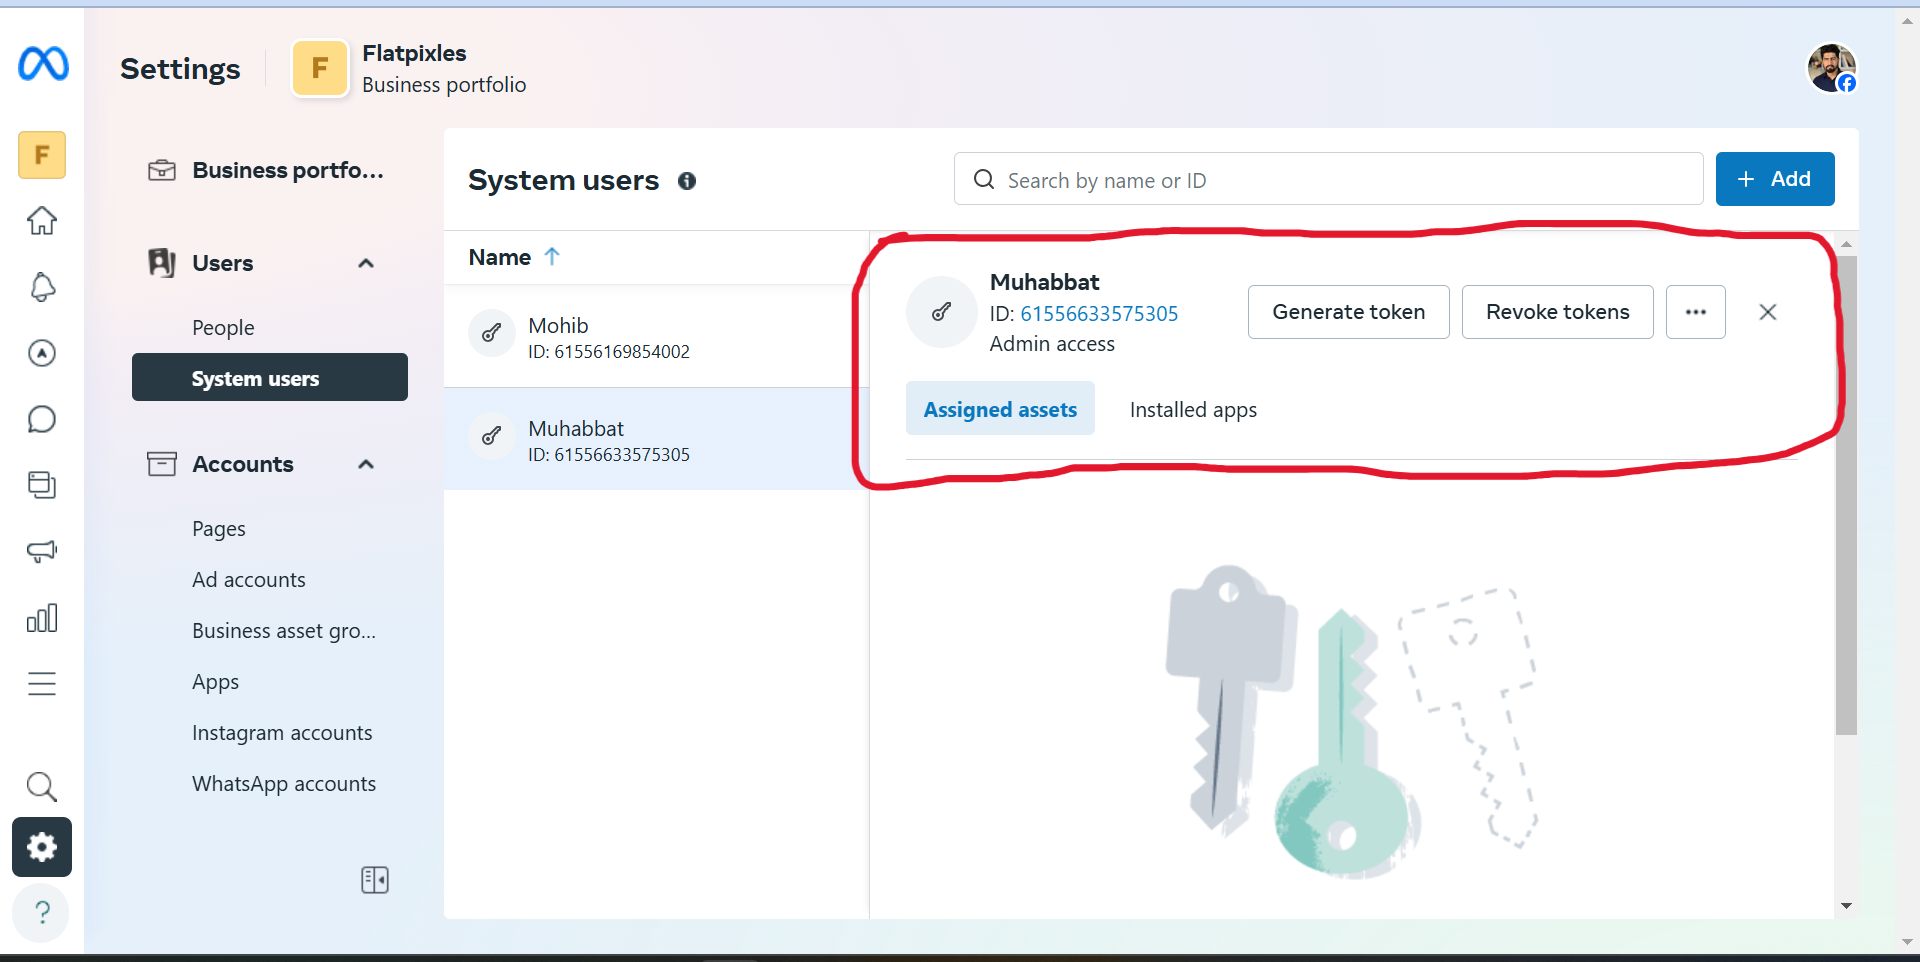
It’s important to understand these terms before getting started WhatsApp token This is a permanent secret token obtained from Facebook’s business profile at Users -> System Users -> Generate Token dashboard after completing some steps on the Facebook business profile WhatsApp Test Number or Sender Number
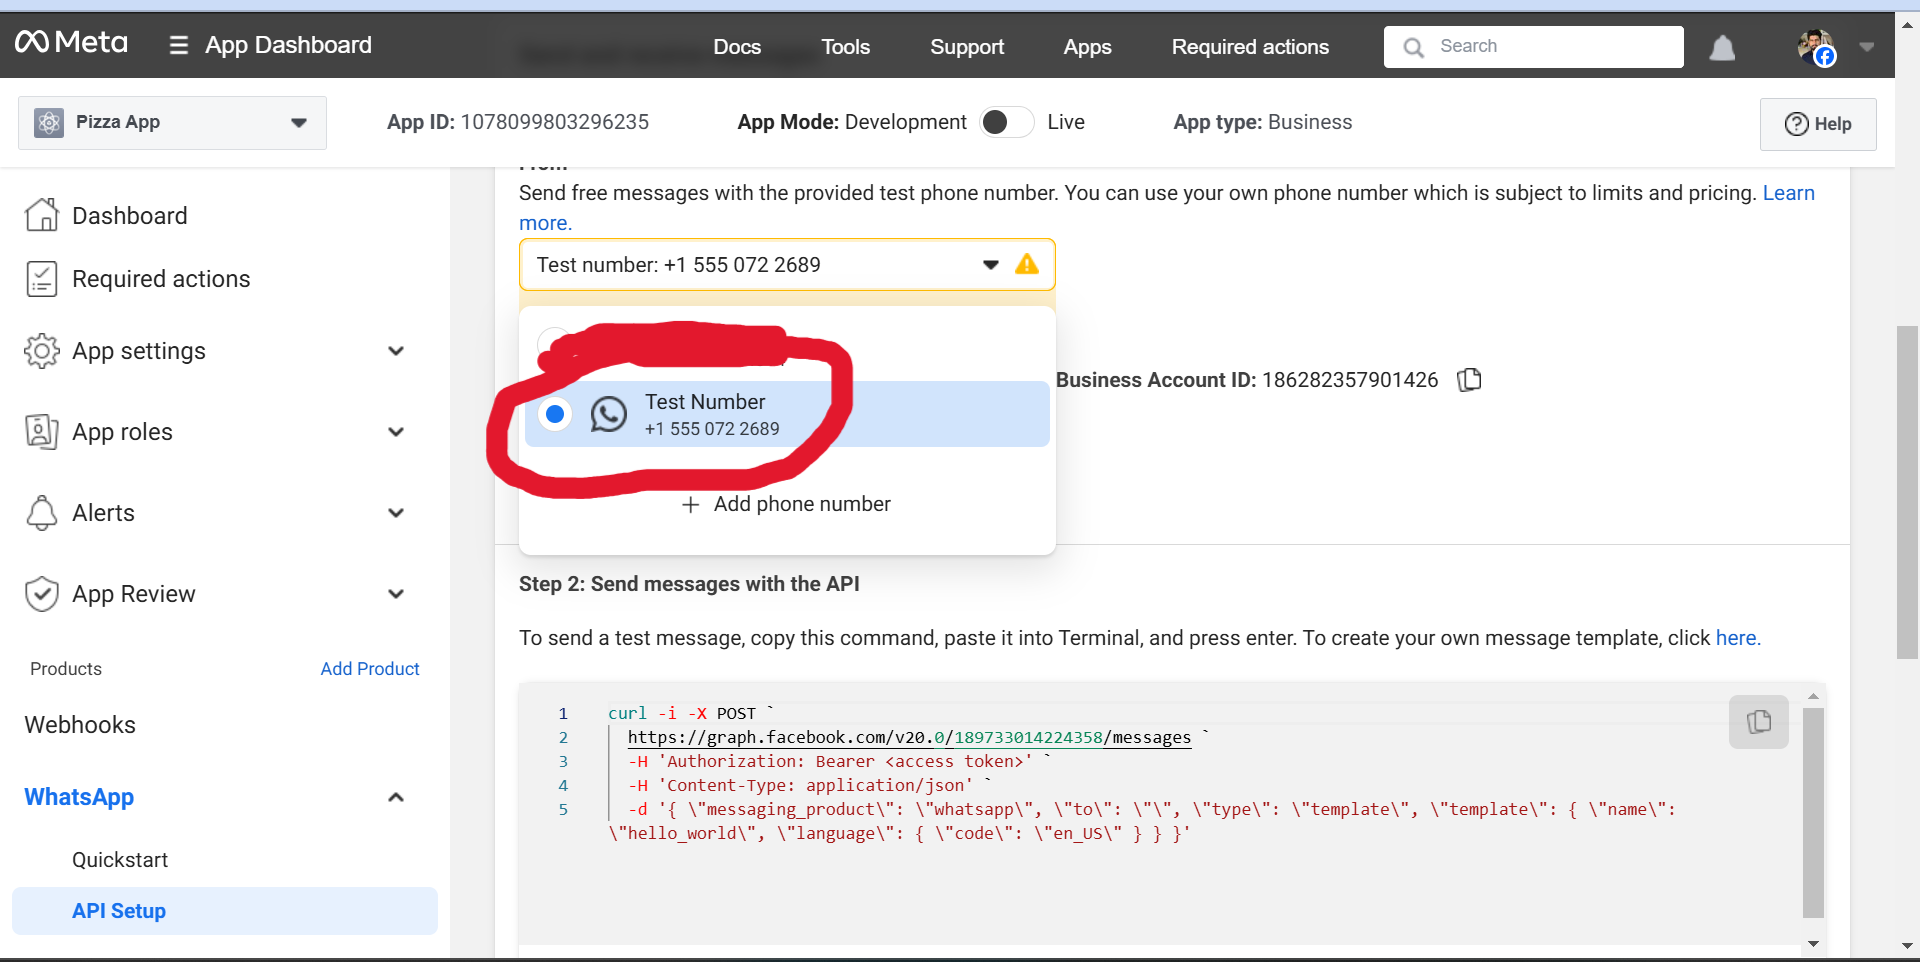
This is a WhatsApp number that sends the message to other users. This number acts as a bot. You can add your own custom phone but this number does not have to be on WhatsApp. In our case, only the owner will receive the messages from this bot so we can proceed with the WhatsApp Test number provided on the Facebook Dashboard.
Recipient Number
This can be the personal number of the owner who can grant permission to the Test Number or Sender Number to receive messages. In this case, the Test Number will only send the messages to the owner so we can set our personal Whatsapp number in this configuration.
Message Template
WhatsApp API or Bot needs a message template to send messages to the Recipient Number. We will define this template in Facebook developer’s dashboard
Facebook Business Profile
Facebook needs an approved Business profile so they provide you a permanent WhatsApp token on behalf of this business profile for using WhatsApp Business API
Facebook Developer App
This is the central dashboard where the user can perform the following actions Create an App to access Facebook API including WhatsApp BusinessCreate WhatsApp ManagerCreate Test NumberCreate WhatsApp TemplatesAdd Recipient Number
Step 1: Create a Facebook Business Profile
Follow This guide to create a Facebook Business Account https://www.facebook.com/business/help/1710077379203657?id=180505742745347
The business profile should be approved by Facebook in order to proceed with the below steps.
While filing the business details, enter the website address of your current website that you have deployed or use any other website if you already have for your business. The website should be accessible in order to get your business profile approved
Create a System user under your business page
We also need to create a system user as this is required by the WhatsApp API. This step creates a system user with admin access and generates a token. The token generated here will be used in API requests to send messages on WhatsApp
Follow this guide
https://www.facebook.com/business/help/503306463479099?id=2190812977867143
OR
- Go to https://business.facebook.com/settings/system-users
- Select your business profile It will navigate to the User > System Users Tab
- Click on Add
- Add The name of the user
- Select Admin from the role dropdown
- Click on Create System User
Generating System User Token
After creating the system user, You need to generate a token that will be used in the environment
- Select system user under Users > System Users
- Select the System user you have generated in the above step
- Click on Generate New Token
- Select the App that is created in Facebook Developer’s Dashboard, The guide for creating this App is given below
- Select token expiry, You can select the recommended 60 days but you have to generate the token again after 60 days, or you can select Never
- Select the permissions that you want to give this user to manage WhatsApp you need to select the following permissions
- whatsapp_business_management
- whatsapp_business_massaging
- Click on generate token button
- Save this token as it will be used as WHATSAPP_TOKEN in node.js application

Step 2: Create a Facebook Developer App
- Go to https://developers.facebook.com/apps
- Click on Create App
- Select App Use Case,
- In our case, Select Other Option and click on Next
- In the next step Select App Type
- For our case Select the Business option and click on next
- In the Details Tab, Add the App name and contact email
- In the Business Portfolio dropdown
- Select The Business Profile that you created in Step 1
- Click on the Create App button
Step 3: Create a WhatsApp Test Account
Follow this guide to run your first test message
https://developers.facebook.com/docs/whatsapp/cloud-api/get-started
After following this you will get two things that are required for our frontend
- WHATSAPP_RECIPIENT_NUMBER
- WHATSAPP_SENDER_ID
WHATSAPP_RECIPIENT_NUMBER will be your test user who receives the message, You need to register this number in the dashboard as you are in test mode and can only send messages to the users added in the dashboard.

Step 4: Create Message Template
We also need to generate the templates for the message format that we will receive from the WhatsApp Test Account. You can further read this guide to create a message template https://developers.facebook.com/docs/whatsapp/message-templates/guidelines/
For our example, we will create a template named user_info with the following structure.
       Customer Name: { { 1 } }
Customer Email: { { 2 } }
Customer Address: { { 3 } }
Here 1-3 in curly braces are the variables that will be passed from the API parameters
- Add Samples for Body Content,
- 1 Represents the Name of the customer (for example Muhabbat Ali)
- 2 represent Contact of the customer ( example 03031122333 )
- 3 represents the Address of the customer (for example Pine Avenue 1 Valencia )
After finishing all this information, We will get three values that we will use in the front end to receive the messages
- WhatsApp token
- Sender ID (Test WhatsApp Business Account Number)
- Recipient Number
Step 5: Send API Request from node.js
We will use node.js to send the HTTP request. However, You can call this HTTP request from any language or framework of your choice whether it’s an Express.js server, PHP Laravel, Python Django, Next.js server-side code, or AWS lambda functions.
       const user = {
	name: 'Muhabbat',
	email: '[email protected]',
	address: 'Avenue 1, ABC'
}

const WHATSAPP_TOKEN = 'your_whatsapp_token'
const WHATSAPP_SENDER_ID = 'sender_number'
const WHATSAPP_RECIPIENT_NUMBER = 'recepient_id'
const WHATSAPP_TEMPLATE_NAME = 'user_info'
const WHATSAPP_API_VERSION = 'v18.0'

const requestBody = {
	messaging_product: 'whatsapp',
	to: WHATSAPP_RECIPIENT_NUMBER,
	type: 'template',
	template: {
		name: 'new_order',
		language: {
			code: 'en_US'
		},
		components: [
			{
				type: 'body',
				parameters: [
					{
						type: 'text',
						text: user.name
					},
					{
						type: 'text',
						text: user.email
					},
					{
						type: 'text',
						text: user.address
					}
				]
			}
		]
	}
}

const requestUrl = `https://graph.facebook.com/${WHATSAPP_API_VERSION}/${WHATSAPP_SENDER_ID}/messages`

const requestHeaders = new Headers()
requestHeaders.append('Content-Type', 'application/json')
requestHeaders.append('Authorization', `Bearer ${WHATSAPP_TOKEN}`)

fetch(requestUrl, {
	method: 'POST',
	headers: requestHeaders,
	body: JSON.stringify(requestBody),
	redirect: 'follow'
})
	.then((response) => response.json())
	.then((result) => {
		if (result.messages[0].message_status == 'accepted') {
			console.log('message sent')
		}
	})
	.catch((error) => console.error(error))